Custom Inflatable Mascots
Many brands, schools, and organizations use mascots to represent their identity, personality, and message. A custom inflatable mascot takes that character and transforms it into a large-scale, three-dimensional display that instantly captures attention. Unlike flat graphics or standard signage, inflatable mascots create an immersive visual experience that people can walk around, photograph, and interact with. This makes them ideal for events, promotions, and brand activations where visibility matters.
Our team specializes in turning two-dimensional artwork into fully realized custom inflatable mascots. Through detailed design mockups and engineering, clients can preview how their mascot will look from every angle before production begins. The result is a durable, eye-catching inflatable built to create memorable moments and strong brand exposure in real-world environments.
Free Renderings
Receive free 3D renderings of your 2D characters before production, ensuring you visualize and approve the design.
Quick Turnaround
2-3 Week turnaround times on most custom projects. Faster turnaround times are available for an additional rush fee.
Custom Designs
Our custom designs utilize the latest graphics and printing technology to deliver stunning and high-quality results.
Trusted by Leading Brands
Brands, schools, and organizations across the country rely on custom inflatable mascots to represent their identity at full scale. From national promotions to live events and touring activations, our inflatable characters help customers bring their brand personalities to life in a way people can see, photograph, and remember.
As a custom inflatable manufacturer, we work closely with each customer to turn artwork, concepts, and brand guidelines into durable, high-impact inflatable mascots built for real-world use, while respecting customer confidentiality throughout the entire process.


Custom Mascot Design Process
Every custom inflatable mascot begins with a visual plan. Our team provides free digital renderings that show how your character will look as a full-scale inflatable before production starts. These detailed mockups allow customers to review proportions, colors, and design elements from multiple angles, helping ensure the final inflatable matches the original vision.

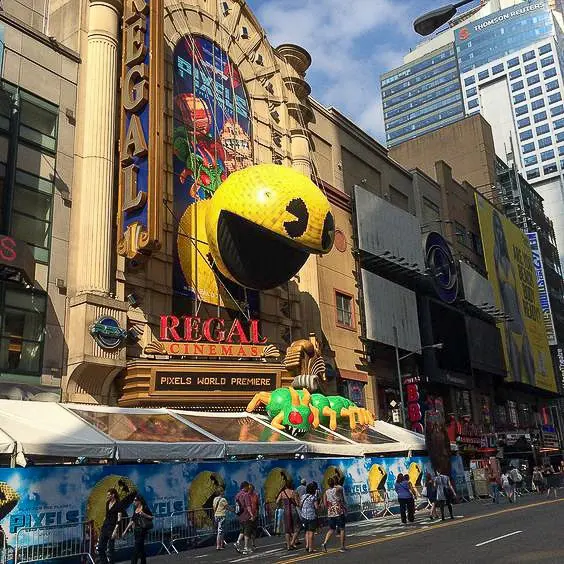
40 foot inflatable pac-man replica

40 foot inflatable centipede replica

40 foot inflatable pac-man replica

A custom inflatable Pac-Man character installed outside a Regal theater, designed as a high-visibility inflatable mascot for entertainment promotions and movie premieres.

This giant inflatable Pac-Man mascot was created for a large-scale promotional activation, drawing attention from street traffic and crowds near a movie theater entrance.

Custom inflatable Pac-Man and Centipede characters designed as oversized inflatable mascots, used to create a memorable visual experience for an entertainment and gaming-themed promotion.

A custom inflatable Pac-Man character installed outside a Regal theater, designed as a high-visibility inflatable mascot for entertainment promotions and movie premieres.
Inflatable mascots can be produced in a wide range of sizes, from smaller event displays to towering, oversized characters designed for maximum visibility. Each inflatable is fully customizable, including shape, facial features, colors, accessories, and branding details. Whether you need a school mascot, a promotional character, or a branded inflatable figure, every design is built to fit your space, your audience, and your goals.

The Impact of Using Inflatable Mascots
Inflatable characters are more than just visual props. They capture attention, create curiosity, and encourage people to stop, look, and take photos. Their large size and friendly appearance make them perfect for drawing in crowds at events, store entrances, and community gatherings. Whether custom made or rented, these characters add personality to your setup and help your brand connect with people in a fun and approachable way.
Custom Inflatable Mascots for Events and Promotions
Custom inflatable mascots are a powerful way to attract attention at events, promotions, and public activations. Whether used for brand launches, retail promotions, festivals, or grand openings, inflatable mascots create a highly visible focal point that draws crowds and encourages interaction.


For short-term needs or seasonal campaigns, inflatable character rentals are also available as a flexible option. Rentals provide a ready-to-use solution for events that require fast turnaround without the commitment of a custom build, while still delivering strong visual impact.
For brands, schools, and organizations looking to create a lasting impression, custom inflatable mascots offer complete creative control. Designed around your artwork, branding, and goals, custom builds are ideal for repeat use across multiple events, tours, and promotional campaigns.
Inflatable Characters FAQ
What are inflatable characters used for at events?
Inflatable characters are large air-filled figures designed to attract attention at events like festivals, trade shows, product launches, and sports games. These custom inflatables help boost brand recognition, entertain guests, and create fun, memorable photo opportunities for attendees.
Can you create custom inflatable characters based on our mascot or branding?
Yes. We specialize in custom inflatable characters modeled after mascots, cartoon icons, or brand personalities. From school spirit animals to corporate mascots, each character is tailored to your specifications with logos, costumes, colors, and expressions that bring your brand to life.
What makes giant inflatable characters effective for advertising?
Giant inflatable characters command attention from long distances, making them perfect for brand activations, street-level advertising, and outdoor displays. Their sheer scale and visual appeal help businesses stand out in crowded environments, encouraging foot traffic and photo sharing.
Do you offer inflatable cartoon characters or themed holiday characters?
Absolutely. We manufacture inflatable cartoon characters, Christmas characters, and holiday-themed designs like snowmen, reindeer, and Rudolph inflatables. These are ideal for seasonal retail displays, holiday events, and family-friendly environments that benefit from cheerful visuals.
What sizes are available for character inflatables?
Most character inflatables range from 8 to 25 feet tall. We can create compact indoor models or large-scale outdoor figures depending on your venue and branding goals. We also produce large character inflatables designed for stadiums, rooftops, and parades.
What are the setup requirements for blow up characters?
Blow up characters typically require a constant air blower, included with your order, and take just 5–10 minutes to inflate. Setup also includes tie-down D-rings, stakes, or sandbags to ensure safe anchoring at your location, whether indoors or outdoors.
Can I purchase inflatable characters for promotional use?
Yes. All of our inflatable characters for sale are made to order and built from commercial-grade materials. They’re perfect for recurring brand activations, recurring events, or permanent display needs. We also assist with replacement blowers and storage solutions for long-term use.
What industries or brands use inflatable advertising characters?
We’ve built inflatable advertising characters for food and beverage brands, theme parks, automotive promotions, sports teams, and retail chains. From Ronald McDonald characters to new product mascots, inflatables help deliver emotional, recognizable branding in 3D form.


